Author: Sourav Chowdhury

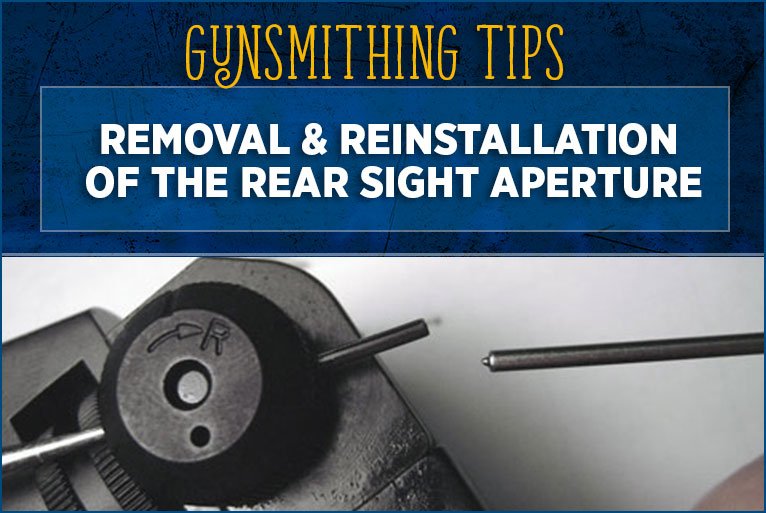
Removal & Reinstallation of the Rear Sight Aperture

For people who want to change out the rear aperture in their A4 carry handle, I have outlined here how to properly do so. Some people like to replace the rear aperture with a tritium night sight for low light shooting conditions. In these instructions I have simply taken apart and reinstalled the stock aperture, but the directions are the same when reinstalling a tritium night sight.

Make sure weapon is unloaded. Wear safety glasses.

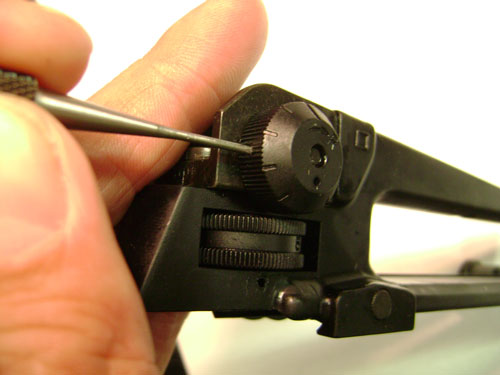
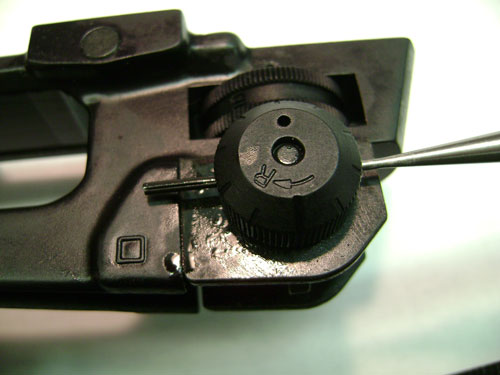
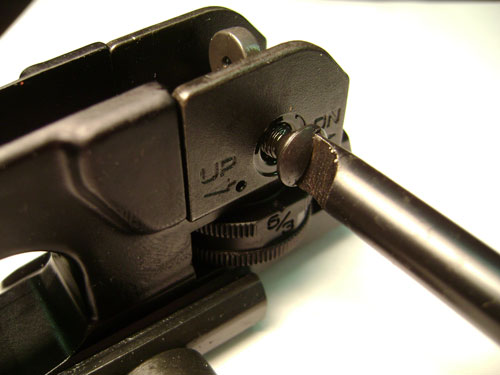
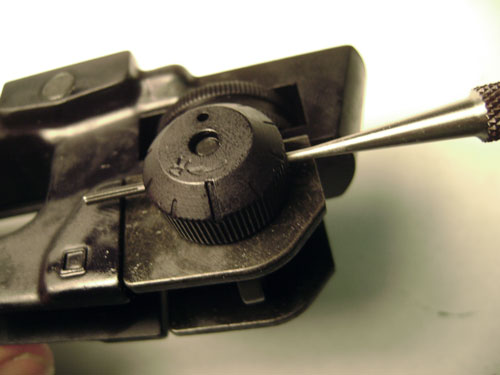
Remove carry handle from upper receiver. With a small hammer and a 1/16″ punch, drive spring pin out about 3/8″.


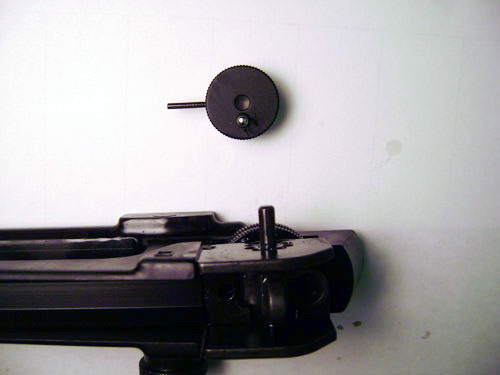
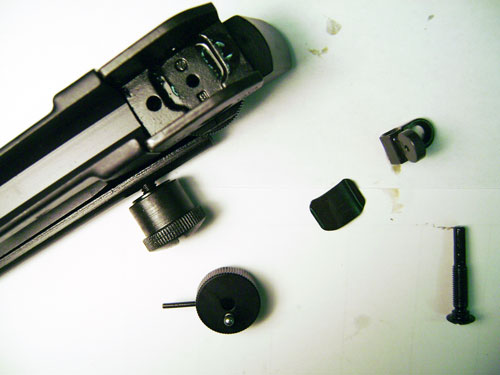
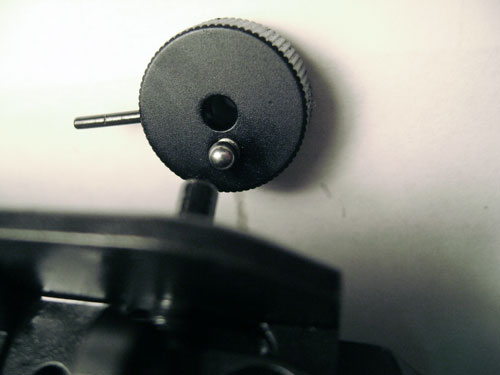
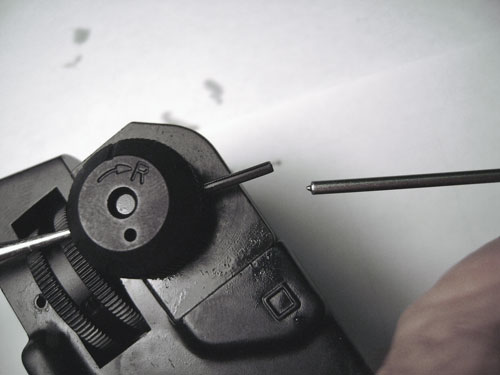
Pull out the punch while holding the knob and slowly pull the knob off being careful not to lose the ball bearing and spring in the knob. It’s best to hold the assembly so the knob is facing down and pull the carry handle away from the knob. Then gravity will keep the spring from falling out of the knob. The ball bearing itself may be stuck to the base with oil. Place ball bearing on top of spring and set the knob aside.


Unscrew the aperture screw and pull it out of the aperture and sight base.
You may now remove the rest of the parts.


Reassembly
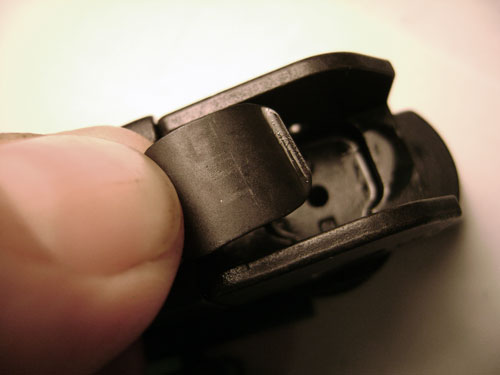
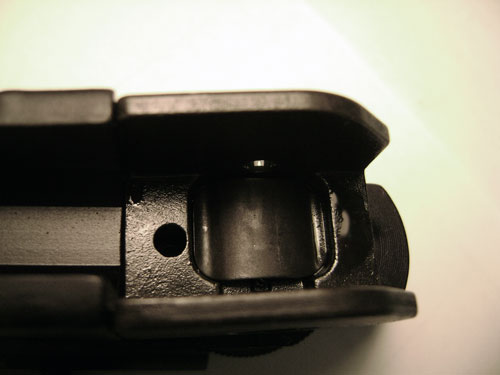
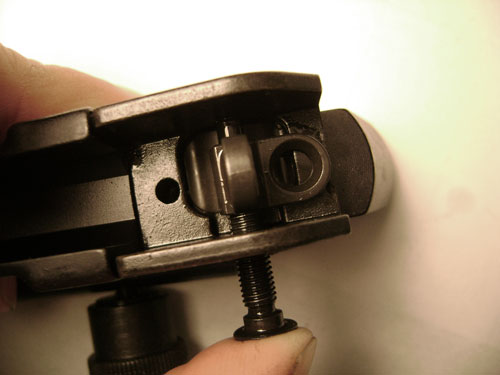
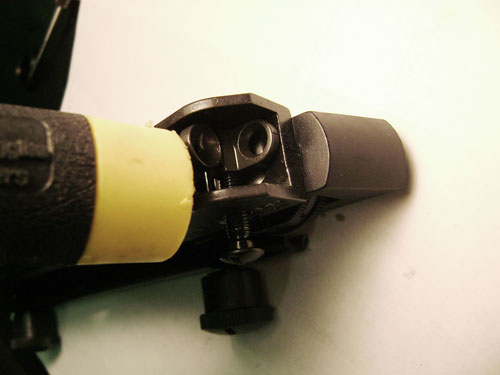
Install the flat spring as shown into rear sight base.


Place aperture on top of flat spring as shown and push aperture screw in through the base and the aperture.


With a plastic mallet tap the top of the aperture while pushing on the screw until it enters the hole in the other side of the base.


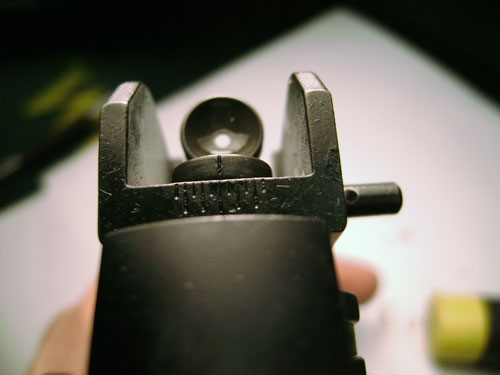
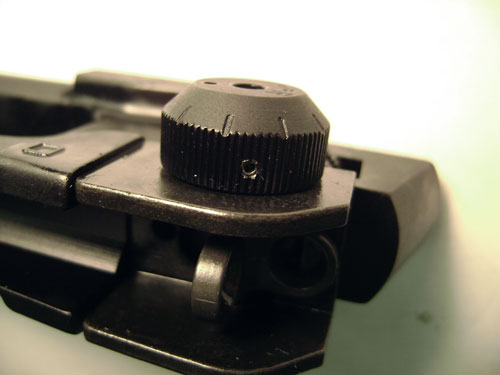
Screw aperture screw in lining up the index mark on the aperture with the middle index mark on the base as shown.

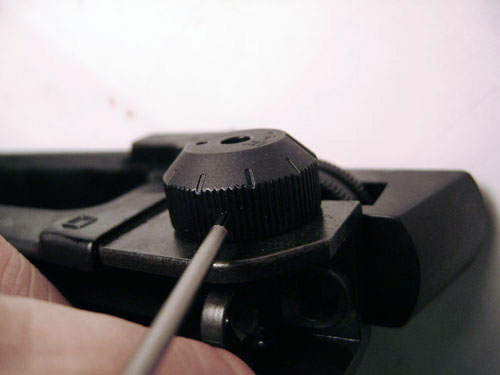
Place windage knob back on the aperture screw. Push the knob on lining up the spring pin hole with the hole in the screw. Push 1/16″ punch back through the hole in the knob and the screw to hold the assembly together.


With a 5/64″ (No. 2) pilot punch, tap spring pin back into the windage knob.


Re-center the windage knob and you are finished.

Proper Pistol Grip Installation

I know for many this seems like a pretty easy task, and it is, but I wanted to run through it because of a common mistake people make. I have seen this dozens of times in my years of working on AR15s. Someone sends a rifle in and the action is locked up solid.  It won’t fire and nothing moves. Then I take the hammer and trigger out of the lower and see this:

What you are looking at is the top part of the pistol grip screw hole where it comes through the bottom of the inside of the receiver. The crumpled up spring is the safety detent spring.

What happens is someone buys an aftermarket pistol grip and removes the stock pistol grip to install it, and the safety detent spring falls out.  Sometimes the safety detent is also lost. They assume the spring must have fallen out of the screw hole so they put the screw in the hole and screw the new pistol grip on. Then they find the safety flops around and the action is locked up.

So here is the proper way to disassemble and reassemble a pistol grip:
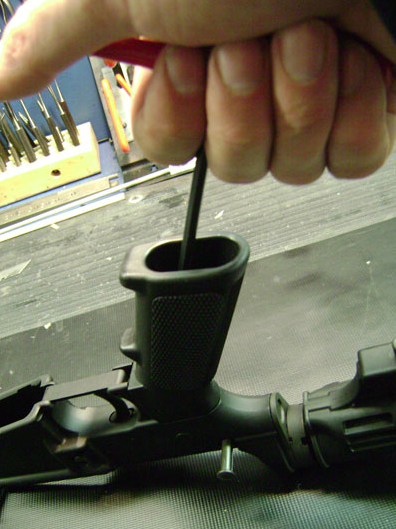
With a 3/16″ T handle Allen wrench remove pistol grip screw and washer.

Keep receiver upside down on a table as shown as you remove the pistol grip.

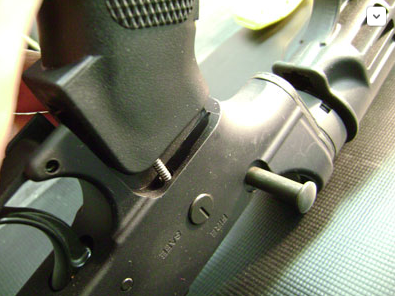
Note above the safety detent spring and its proper placement in the safety detent hole.

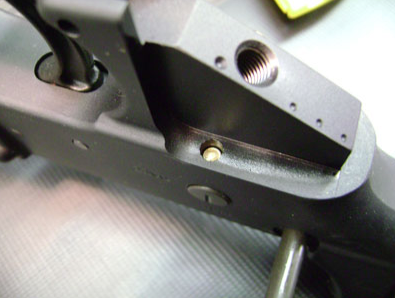
Remove pistol grip. Note the gold safety detent in the hole. This is why it’s best to keep the receiver upside down so this does not fall out. 

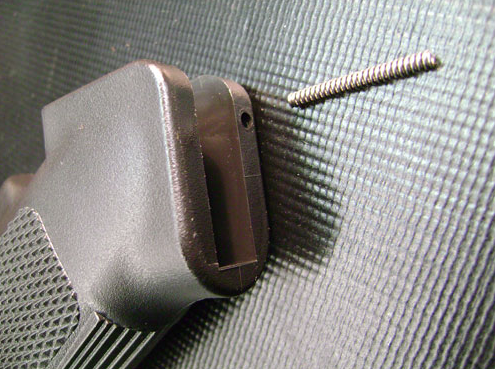
This is the hole in the pistol grip where the safety detent spring goes.

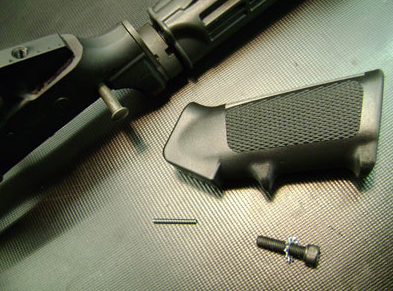
And here are all the parts.

Sometimes the pistol grip washer is stuck up inside the pistol grip. If it is just poke it out through the top of the screw hole in the pistol grip. If the replacement grip does not come with its own screw, use the factory screw for installation of the new pistol grip. If it comes with its own screw be sure to use the screw that comes with it. Some grips have a different thickness inside and may require a longer or shorter screw than the stock screw. Also some pistol grip screws use a slotted screw instead of an Allen screw so a screwdriver is required for reinstallation. Reinstall the grip in the reverse order above. When you put the safety detent spring in its proper holes press the grip down and hold it on. This will line the screw up at the proper angle for reinstallation and you will not cross thread the screw.

Inside the WW-15

The vast majority of AR15 shooters have a good idea about how the weapons work, but for those of you that might like a clearer view, here’s a look inside with some explanations of what goes on.

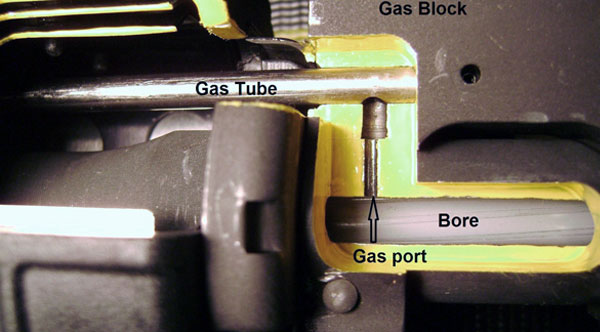
First here is the gas port coming out of the barrel and into the gas block. When a round is fired and the bullet passes the port, the hot gasses enter the port and then into the gas tube.

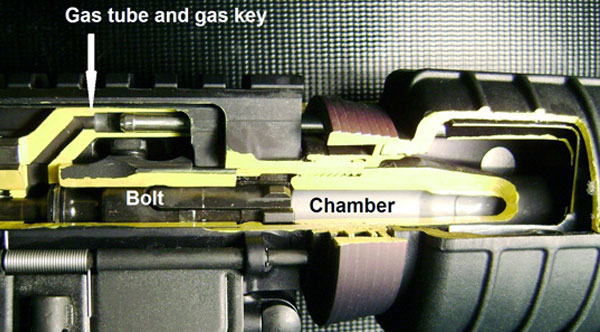
The hot gasses travel down the gas tube entering the gas key on top of the bolt carrier. Through a port in the carrier, the gasses blow into the area at the back of the bolt itself. This forces the carrier backwards away from the bolt. As the carrier moves backwards the cam pin that goes into the bolt through it, slides in a notch that forces the bolt to rotate. This rotates and unlocks the bolt after the pressure of the fired round has dropped with the bullet exiting the bore. This allows the carrier to continue its backward motion to the rear stopping when it goes as far back as it can against the buffer and spring. The empty case is simultaneously extracted and ejected from the gun and the carrier moves back forward under tension of the buffer spring, stripping a fresh round from the magazine and chambering it into battery.

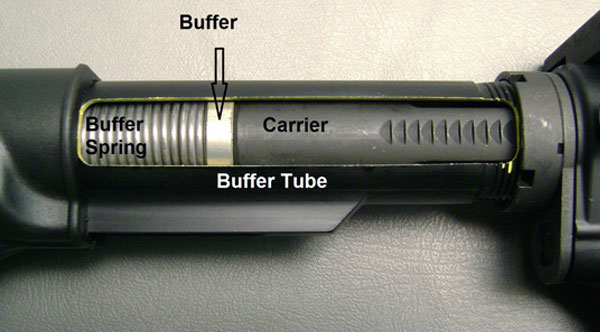
This photo shows the carrier compressing the buffer and spring all the way to the rear.

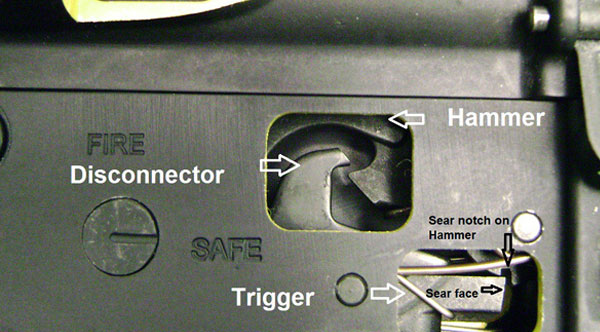
Inside the receiver, this photo shows what the hammer and trigger positions look like when the bolt is locked to the rear. When the gun is fired and the hammer comes back, the disconnector engages the hook on the back of the hammer holding it back. When the trigger is released it drops off of the disconnector and stops on the sear which is on the trigger at the sear notch in the hammer. This makes it so the gun can only be fired one shot at a time or in “semi-auto” only.

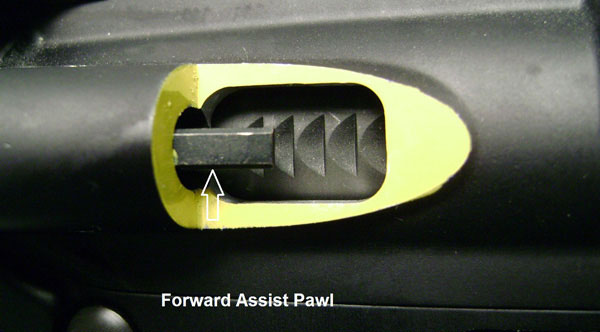
And this is where the forward assist pawl engages the notches in the bolt carrier assembly. If the weapon does not go fully into battery when chambering a round, pushing the forward assist helps the carrier forward to send the bolt all the way into battery.


Choosing Iron Sights for the SRC

When choosing iron sights for the SRC rifles, it is important to make sure you get the correct height front sight. Most manufacturers of rail mounted iron sights make two different heights for the front sight. With the SRC (and VEX rifles) you have to make sure you get a front sight that is for “same plane” sighting. In other words it has to be the same height as the rear sight that is mounted to the picatinny rail on the upper. Some confusion comes in here when you see a company that offers a “Gas block height detachable front sight”.

Right now we are one of the only manufacturers that make an AR15 in which the picatinny rail on the gas block is on the same plane as the upper receiver. Most company’s gas blocks have rails that are lower than the rail on the upper. Front sights for these rifles have to be made taller to make up this difference in height. So what happens if you mount one of these taller front sights on an SRC is your rifle will end up shooting way too low and you cannot move the front sight post down far enough to get the gun on target.

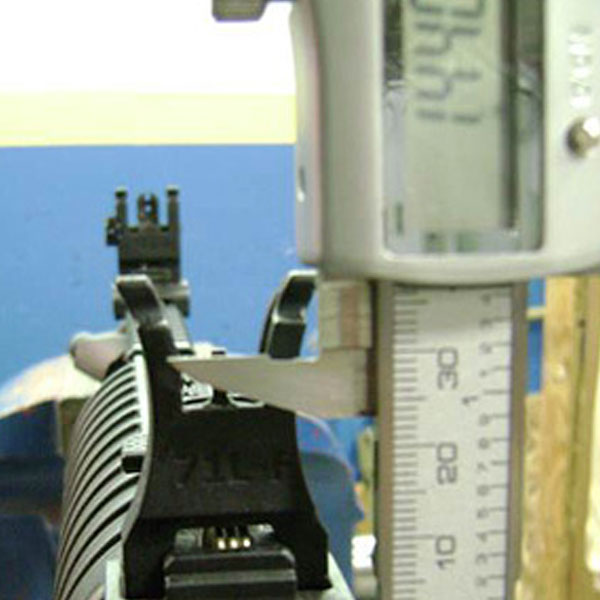
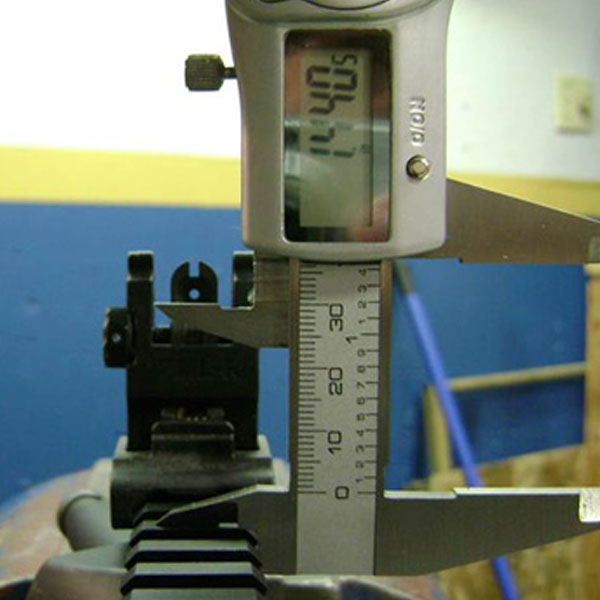
Below is approximately what the measurement is supposed to be for the front and rear sights. Note that is has to be the same or at least close to this measurement for both sights.

Rear sight, approximately 1.440″ from top of rail to aperture: 


Front sight, approximately 1.440″ from top of rail to top of front sight post:

Ban Compliant Models

I’ve had a few e-mails recently from customers thinking their tele-stocks were broken as they would not adjust. One person broke the latch trying to move a permanently extended tele-stock from one of our Ban Compliant guns. Unfortunately not all people know what the laws regarding assault weapons are in their states and some gun dealers fail to inform them of these laws. If you live in New York, Connecticut, Massachusetts, Maryland* or New Jersey please note the following differences in the guns we manufacture for those states. Note: * Maryland is not a ban state, but does have a magazine restriction. Only magazines with capacity of 20 rounds or less are legal.

First, the permanently extended tele-stock. These are not adjustable and the length of pull cannot be changed as the receiver extension is longer than on an adjustable tele stock. These are not simply made out of adjustable stocks.

Top image above shows an adjustable tele-stock with recesses for the locking mechanism. Lower image shows the non-adjustable stock – no adjustment recesses on the receiver extension.

Second, the permanently attached muzzle brake. These are welded on and cannot be removed.

Third, NO Bayonet Lug:

Ban compliant models also are not supplied with 30 round magazines. They will have a 10 or 20 round magazine depending on the state they are intended for.

California Models

We also make models intended only for sales in California. For California, the only difference in the rifle is that they are required to have a “bullet button” magazine release installed and have a magazine that holds no more than 10 rounds for legality in that state. The law states that a tool is required for magazine removal. These models have a sleeve that replaces the magazine catch button that cannot be depressed. In order to remove the magazine a tool must be used to push in on the center of the sleeve where threaded end of the magazine catch comes through.

I have had rifles come back to me where it is stated in the notes “magazine catch does not work” and they are actually California models. I think sometimes California models accidentally get ordered through distributors for states other than California and that’s where this confusion comes in.

Is my Flash Hider or Muzzle Break Removable?

Now and then I get the question “Is my flash hider or muzzle brake removable?”

Currently we sell rifles that are “pre-ban” style or “Sunset” rifles which means they now have all of the features that were banned when the 1994 Assault Weapons Ban was in effect. When the AWB sunset in 2004 these features were once again legal in most states as there is no longer a federal ban on them. One of these features is removable flash hiders/threaded barrels. On all of our 16 inch rifles which are of the “sunset” configuration (flash hiders/threaded barrel, bayonet lugs, collapsible stocks), the flash hider is removable with a ¾” end wrench. Photo of a typical A2 Flash Hider here…


We also build rifles for the states that enacted their own assault weapons ban when the federal ban sunset in 2004. These states are NY, CT, MA, MD and NJ. The rifles we build for these states must not have removable flash hiders or access to the barrel threads. They must have a muzzle brake instead of a flash hider and this muzzle brake must be welded on. These muzzle brakes are NOT removable and to try to remove them with a wrench will destroy the barrel. These are pinned and welded in two spots that go down into the threads on the barrel. Photo of a welded on Muzzle Brake shown here… 

We are also going to start building rifles with 14.5 inch barrels and welded flash hiders. Federal law states that all rifle barrels must be no shorter than 16″ in overall length (unless you file the appropriate paperwork and pay a $200 tax). Any barrel we build for the commercial market that has a 14.5″ length will have a flash hider welded onto the end to make the overall length over 16″. These flash hiders will also NOT be removable. Photo of a welded on Vortex Flash Hider here – note the weld mark…

 In the many years I’ve been repairing AR15s I’ve seen a lot of ruined barrels where people tried to remove a welded brake or flash hider. Before trying to remove one, be sure that it is not welded on! 

5.56 AMMO in a VEX

[fusion_builder_container hundred_percent=”no” equal_height_columns=”no” hide_on_mobile=”small-visibility,medium-visibility,large-visibility” background_position=”center center” background_repeat=”no-repeat” fade=”no” background_parallax=”none” parallax_speed=”0.3″ video_aspect_ratio=”16:9″ video_loop=”yes” video_mute=”yes” border_style=”solid” type=”legacy”][fusion_builder_row][fusion_builder_column type=”1_1″ layout=”1_1″ background_position=”left top” background_color=”” border_color=”” border_style=”solid” border_position=”all” spacing=”yes” background_image=”” background_repeat=”no-repeat” padding_top=”” padding_right=”” padding_bottom=”” padding_left=”” margin_top=”0px” margin_bottom=”0px” class=”” id=”” animation_type=”” animation_speed=”0.3″ animation_direction=”left” hide_on_mobile=”small-visibility,medium-visibility,large-visibility” center_content=”no” last=”true” min_height=”” hover_type=”none” link=”” border_sizes_top=”” border_sizes_bottom=”” border_sizes_left=”” border_sizes_right=”” type=”1_1″ first=”true”][fusion_text]

I’ve had a few customers inquiring recently as to whether they can shoot 5.56 NATO ammunition in their Varmint Exterminator rifles since the barrel is marked “223”.

The Varmint Exterminator is safe with decent factory loaded 5.56 NATO ammo. We put .223 on the barrel as that is what is recommended for best results – match grade .223 ammunition.

The VEX has what is called a “5.56 Compass Lake” chamber. This means the leade (amount of freebore before rifling) is shorter than on a 5.56 but not as short as a .223. Also the angle into the rifling is a little different.  The overall chamber dimensions are slightly tighter as well and the bolt is matched to the chamber for better accuracy. Frank White, of Compass Lake Engineering, developed this chambering many years ago for competition shooters and this chamber is widely used in many service rifles used for target competitions at Camp Perry.

I have fired Federal M855 5.56 NATO ammo in VEX rifles with no ill effects. If you should fire any foreign 5.56 ammo through it, just keep checking the primers to make sure they aren’t backing out, popping out or severely flattened.  Some of the foreign military ammo can run a little hot and may not run efficiently in the tighter chamber of the VEX rifles.

Erik Winter, Gunsmith

[/fusion_text][/fusion_builder_column][/fusion_builder_row][/fusion_builder_container]

Newsletter – Vol. 5 / Issue 12


Vol. 5 / Issue #12 / Dec. 2016


MARKETING NEWS


Mark Eliason, VP Sales & Marketing
Another year has nearly come & gone – where does the time go?
All of us at Windham Weaponry would like to wish our friends and customers a very Merry Christmas, with hopes for a healthy and prosperous New Year.
Take a moment to look at our feature rifle for this month. We developed it specifically for the New York State market where – because of their legal regulations – a number of the usual features of an AR15 rifle are banned. So this NY State model features the unique Thordsen Stock / Grip combination. This stock offers a comfortable sporting rifle type grip that flows back into the “free-standing” buttstock & plate – leaving the buffer tube as just an extension of the receiver. Again according to NY regulations, the magazine is limited to 10 Rounds, the muzzle of the barrel is machined with a plain “competition crown”, and the front sight base has had the usual bayonet lug machined off. With all those changes, this rifle still offers all the accuracy, quality and durability of our other models as its other components are all the same as standard production rifles.
 
Go to  windhamweaponry.com/  to see all our rifles and accessories. Or, call us for a free catalog (1-855-808-1888) – we’d love to hear from you.
As always, hunt and shoot safely, and feel free to contact us with any AR related questions.


If you work in the firearms industry, you’re no doubt aware that SHOT Show 2017 is right around the corner. So, if you are attending, please stop in at Booth 10376 to see all our new offerings, or just to say hello! We look forward to seeing you!

This Month’s Feature Rifle:
Windham Weaponry “MPC-NYTHD” for the NY State Market


Model: R16M4A4CRN-NYTHD  (Compliant with regulations in New York State)
MSRP: $1272.00


Caliber: .223 Rem. / 5.56mm NATO
Weight/Length: 7.1 lbs without magazine. / 34.75″ overall


Type:  Rifle, Semi-Automatic, Gas Impingement System
Magazine: 10 Rounds (ships with one 10 Round magazine)
Receiver: Forged 7075 T6 aluminum flat top upper receiver with Aluminum Trigger Guard
Receiver Finish: Hardcoat Black Anodize Finish
Bolt:  Carpenter 158 Steel
Barrel:  16″ M4 Profile, Chrome Lined with Crowned Muzzle
Barrel Material: 4150 Chrome Moly Vanadium 11595E Steel with M4 Feedramps
Chamber: Compass Lake Specification with Matched Bolt
Rifling: 1 x 9″ Right Hand Twist
Stock/Forend: Thordsen Stock (New York Compliant) with Grip / M4 Double Heat Shield Handguards 
Rear Sight: A4 Dual Aperture Elevation & Windage Adjustable: 300 – 600 M
Front Sight: Adjustable Height Square Post in A2 Standard Base
Includes: Lockable hard plastic case, black web sling, Full Color Operators Manual, Transferable Lifetime Warranty
See your local FFL Dealer to purchase.

Erik at his bench
FROM THE GUNSMITH’S BENCH
Erik Winter, Windham Weaponry Gunsmith
 
TOPIC: Installation of the POF Dictator Adjustable Gas Block


With suppressor use on the rise the use of an adjustable gas block to control the operation of the rifle makes a lot of sense for those who are using one. In the case of the .308 it is usually necessary for reliable functioning of the rifle when shooting suppressed. Too much back pressure from the suppressor in the powerful .308 cartridge will often cause reliability issues as the rifle will run way too hard as the rifles are tuned to be fired unsuppressed. I have fired 5.56 caliber rifles suppressed successfully with no adjustable gas block but even in that caliber it usually makes sense. It is a lot easier on the rifle and more pleasant to the shooter to dial the gas pressure back a little.
In the following tutorial, I show the installation of the POF Midlength .308 adjustable gas block on one of our 16″ .308s with the 15″ Midwest Industries free floating handguard.

First as always make sure the weapon is unloaded, then push the takedown and pivot pins out and remove the upper from the lower.  Then remove the screws that secure the handguard to the barrel nut. In the case of the Midwest Industries handguards they are Loctited to the barrel nut. On a hard non marring surface hold the handguard and thump the muzzle end down to free the handguard. If it seems not to want to budge apply a little torch heat to the area that is Loctited then the handguard should come free from the barrel nut.


With a center punch put a punch mark in the hole at the rear of the factory gas block in the dead center. This is where the gas port is located on the top side and you will use this mark to line up the adjustable gas block.

With a wide flat punch and a hammer start both of the taper pins. You will be hitting them left to right. Note one head of the taper pin is smaller than the other. You want to drive them out from the small side. Once they are started, use a smaller punch to drive the pins all the way out.

With a wooden or plastic mallet drive the gas block and gas tube assembly off the barrel. Once it is off degrease the barrel and also the insides of the POF gas block where it will contact the barrel.

Slide the POF gas block assembly on and line up the rear punch mark with the back screw hole. It should line up with the gas block pushed all the way to the rear (if you are installing this on a rifle that had a standard handguard and handguard cap the gas block will be slightly ahead of the shoulder on the barrel. In this case this gas block can only be used if you are also installing a free float handguard like the Midwest industries)
Once the punch mark is visible put another punch mark through the front screw hole in the dead center.

Before I go further I want to mention that I’m showing how to put divots in the barrel to correspond with the set screws. I am showing this as this is the method POF instructs it to be done. When I first tested one of these I did not do this. I simply used the Loctite as I will describe below and the gas block held on just fine. So the divots may be unnecessary. But if you want that added step of confidence that the gas block will not move, put the divots in. Also note that sometimes the screw holes may line up with the taper pin holes where the steel is very thin. In this case the set screw will really just bend the steel in a bit where you are installing it and that really will do the same thing as putting a divot there. You will see in one of my pictures where the divot was actually starting to break through that area anyhow.

When drilling the divots use a carbide drill bit for best results. I used a .170″ carbide drill bit in this case. All you want to do is put a pretty shallow divot in the barrel.

Put green 680 Loctite on the two areas of the barrel where the gas block contacts. Slide it on and line up the back divot again so it looks dead center in the hole. Let the gas block set for a while. After 15 minutes or so you should no longer be able to move the gas block by hand and it should be at 12 O’ Clock with the upper receiver.

Put a little red 262 Loctite on the screws and screw them into the gas block. Wipe off any excess Loctite.

Reinstall handguard with some fresh 680 Loctite around the barrel nut. Torque the handguard screws down to 28-32 inch pounds.

A little wrench comes with the gas block that can be used for adjusting it, but when a long free float handguard like this is installed it can’t be used. There are also slots in the gas block adjuster so you can just reach in there with a screw driver to adjust the gas block.
In this case I turned the adjuster in all the way and turned it back out until the rifle ran perfectly and locked back on every empty magazine on the last shot. When shooting unsuppressed you will have it turned out quite a bit. With a suppressor you will adjust it in more. There are nine positions on this gas block so you can adjust it perfectly for your suppressor and loads. When adjusting it in the field though just make sure that between firing and making adjustments you unload the rifle each time and lock the carrier to the rear so you can visually see there is no round in the chamber. When adjusting your hand will be in front of the muzzle so this is VERY important. You don’t want to lose a hand or worse.

As with all of our items, these can be installed here at the factory if you don’t want to tackle it on your own. There is no labor charge. Just call customer service at 1-855-808-1888 to set it up.


If you ever have questions about your rifle, you are always welcome to call Windham Weaponry Customer Service (Toll Free: 1-855-808-1888). Shoot Safely!


CUSTOMER SERVICE CORNER
Cheryl Eliason, Customer Service Manager


We receive a variety of customer service related questions from our customers, and in order to better serve all of you, highlight one question each month.


This month’s question is:
What’s the recommended break-in procedure for my new Windham Weaponry rifle?
 
Answer:
With any new firearm you should first always run a patch through the bore before firing.On our chrome lined barrels, shoot about 100 rounds of new factory brass cased ammunition that corresponds to the caliber stampings on your barrel, then clean it normally after that. It will be sufficiently broken in at that point.If you have a VEX-SS (Varmint Exterminator) model with the stainless steel barrel, the break in is as follows:

Fire one shot, then clean your barrel. (Repeat this step 5 times.)
Fire 3 shots, then clean your barrel.
Fire 5 shots, then clean your barrel and you’re done.

We recommend .223 ammo in the VEX-SS for break in and best accuracy results. We have tested the VEX rifle with 5.56 mm NATO ammo and found it safe to shoot, but we’ve had the best accuracy with match grade .223 ammo. In our testing we have found Federal Premium 69 grain BTHP and Hornady 75 gr BTHP to perform really well and deliver excellent accuracy in the VEX.


WINDHAM WEAPONRY FEATURED PRODUCTS


Matt Hasty, Retail Sales Manager


Windham Weaponry  RealTree Camo Hat


PART #ACC-BCAP-RLTREE
$10.95


With a Realtree Camo crown and bill and cool tan mesh back, this hat makes a striking statement on the range or in the field. A comfortable “one size fits all” design features a tan embroidered Windham Weaponry logo over the bill and an adjustable Velcro back-strap for snug fit. 


Windham Weaponry Black “Hoodie” V-Neck Sweat Shirt for Women
Think pink with this new Windham Weaponry Black “Hoodie” Style Women’s Sweat Shirt. This high quality,
9 oz., 60/40 Cotton/Polyester Fleece Pullover is embroidered with Windham Weaponry’s classic script logo in pink on the front and screen printed larger with our quality watchwords on the back. It features raw serge edges; a thick white drawcord; 2×1 rib trim on the waistband and cuffs; raw edge seams around the hood opening, pocket seams and neckline. Front pouch pockets offer convenient storage and handwarming.
Available in Womens’s Sizes: S-2XL  


Part Number                        Size      Price
ACC-HOODIE-VNECK-S Small $34.95
ACC-HOODIE-VNECK-M Medium $34.95
ACC-HOODIE-VNECK-L Large $34.95
ACC-HOODIE-VNECK-XL X Large $34.95
ACC-HOODIE-VNECK-2X XX Large $37.95


Want to Order? or If You Have Questions? 
Call Customer Service / Sales  1-855-808-18888


LAW ENFORCEMENT
Todd J. Coons, VP Law Enforcement & International Sales
WHAT’S NEW IN LAW ENFORCEMENT


Happy December to Everyone!

I will be attending Shot Show again this year from January 15th to January 21st. We’ll be in Booth #10376, so please come by and check out the “NEW” additions to the Windham Weaponry line.
I just got back from Las Vegas as I was attending the Wrangler National Finals Rodeo. We here at Windham Weaponry have been involved in the rodeo for going on 4 years now. We have 4 amazing cowboys in the finals this year! – Tanner Aus; Tim O’Connell; Heath DeMoss and Nick Guy. Take a minute to check out their Facebook links below and show them some support.


Tim O’Connell Video


Heath DeMoss – https://www.facebook.com/HeithDeMoss/

As many of you out there know, we here at Windham Weaponry have done some very special builds for many police departments out there. I would like to share one of our latest special builds that we did for the officers at Cattaraugus County Sheriff’s Department in NY.  This build was a challenge to meet all the needs of the department but with the help of Detective Kenneth Rice of the Cattaraugus County Sheriff’s Department we were able to build some amazing rifles. Ken noted with enthusiasm on that photo that “We love ’em!”. A special thanks to the officers for allowing Windham Weaponry to do this for you all, and for sharing such an AWESOME photo.  Stay Safe my friend!

Please keep in mind that if your department or agency is looking for rifles, and if you have firearms to trade, PLEASE reach out to my assistant Cindy Thompson or me in order to give us the opportunity to earn your business.


We would LOVE to work with you.

Happy Holidays Everyone!


Stay safe out there,
Todd J. Coons
Vice President, Law Enforcement & International Sales 


CUSTOMER FEEDBACK  In this Section, we encourage our customers & friends to send us their comments, photos and experiences with Windham Weaponry products. What are you doing with your Windham?


*******************
Another Windham Fan…


You gents and ladies are doing it right, my Fav AR company!!
Jay Hall
*******************
A Proud Dad…


My son got his first buck using your 7.62×39 AR15 this year. He shot it at 60 yards and he went down.
We love this gun!!

Randy Drumheller


**********************
A Fan of the Snow Camo VEX
Hello;
I’d just like to send you some feedback on this Fabulous Rifle! I asked someone out there on the best bullet weight for Deer hunting. (Our Gunsmith answered that we get very good groups with Federal Premium 69gr BTHP, Australian Outback 69 grain BTHP and Hornady 75 grain BTHP.)
Well, I opted for 62gr and I’ll tell you, sighting this stuff in for Deer is great! I suppose I could have used other stuff but this went into the Center of the Target at 100 yds at .5 – dead on or less!! I wish I would have saved the damn Target to show!! Well anyway, anybody reading go out and get GET THIS RIFLE !!!

HAPPY HOLIDAYS TO ALL AT WINDHAM WEAPONS !!
Chuck Dawley

**********************
To send items, please email:  newsletter@windhamweaponry.com   We look forward to hearing from you!


We’ve just completed a first – and very successful – year of operation here at  


and we want to thank our friends and customers for all your support.


Here’s wishing you...


…and we look forward to seeing you in the New Year!


The Windham Indoor Shooting Range
…where “Training Begins at the Door.”
 
For complete information see:  www.windhamindoorshootingrange.com
Windham Weaponry on AR15.com
AR15.com Logo
We regularly respond to questions and topics on this informative website.


Contact Us:


Windham Weaponry, Inc.
999 Roosevelt Trail
P.O. Box 1900


Windham, ME  04062  
U.S.A. 
Tel: 207-893-2223
Fax: 207-893-1623


Phone Sales/Customer Service:
Toll Free: 1-855-808-1888


Your feedback is always welcome.
 
Feel free to send us photos of how you enjoy using your Windham Weaponry rifle. We would love to hear from you.
 
Please contact us through windhamweaponry.com/  or


SHOOT SAFELY,
Windham Weaponry Logo

Newsletter – Vol. 5 / Issue 11


Vol. 5 / Issue #11 / Nov. 2016


Mark at SFGC

MARKETING NEWS


Mark Eliason, VP Sales & Marketing
Not trying to scare you about the snowy prospect of the coming Winter – just reminding you that plenty of good outdoor sport exists in the colder months. And what better way to revel in the season than to take a Windham Weaponry Snow Camo VEX out for a varmint hunt in the snow!
This is the perfect rifle for calling those wary coyotes. The matte finish stainless fluted barrel is not only accurate, but glare free so you won’t spook them, and the beautiful Snow Camo finish on forend, receivers and stock will help you blend in to your winter surroundings. With a Compass Lake Chamber & Matched Bolt specifically designed for .223 Rem. caliber varmint rounds up to 77 grains bullet weight, and a free floating tubular aluminum hand guard, you’ll have the accuracy and reliability to reach out to any varmint that comes your way.
Check out the Windham Weaponry R20FSSFTS-C1 Snow Camo VEX below – or go to  windhamweaponry.com/  to see all our rifles and accessories. Or, call us for a free catalog (1-855-808-1888) – we’d love to hear from you.
As always, hunt and shoot safely, and feel free to contact us with any AR related questions.

This Month’s Feature Rifle:
Windham Weaponry Snow Camo VEX-SS 


Model: R20FSSFT-C1   
MSRP: $1470.00


Caliber: .223 Rem.
Weight/Length: 8.2 lbs without magazine. / 38.5″ overall


Type:  Rifle, Semi-Automatic, Gas Impingement System
Magazine: 5 Rounds (accepts all standard AR platform sizes)
Receiver: Forged 7075 T6 aluminum flat top upper receiver with Aluminum Trigger Guard
Receiver Finish: Hardcoat Black Anodize Finish with Snow Camo Hydrographic Coating
Bolt:  Carpenter 158 Steel
Barrel:  20″ Stainless Steel, Fluted, Matte Finish
Barrel Material: Precision 416R Stainless Steel
Chamber: Compass Lake Specification with Matched Bolt
Rifling: 1 x 8″ Right Hand Twist
Stock/Forend: Solid A2 Stock with Sling Swivel & SNow Camo Coating 
Forend: Knurled, Vented Aluminum Free Float with Snow Camo Coating
Pistol Grip: Standard A2 Plastic Pistol Grip with Snow Camo Coating
Rear Sight: None – Ready for Optics or other type accessory sights
Front Sight: None – Picatinny Rail Gas Block – Ready for accessory sight
Includes: Lockable hard plastic case, black web sling, Full Color Operators Manual, Transferable Lifetime Warranty
See your local FFL Dealer to purchase.

Erik at his bench
FROM THE GUNSMITH’S BENCH
Erik Winter, Windham Weaponry Gunsmith
 
TOPIC: Installing an Elftmann .308 Trigger


First make sure the rifle is unloaded, and separate the upper from the lower receiver by pushing out the takedown and pivot pins in the lower. Set the upper aside.

With a 1/16″ T-handle allen wrench, remove the pistol grip screw. With the lower upside down slowly pull the pistol grip up off the receiver. Note the two springs and their locations. One spring gives tension to the takedown detent and the other spring gives tension to the safety detent. The safety detent spring is in the pistol grip, and the takedown pin detent spring will be sticking out of the smaller hole in the lower.  Just leave the safety detent spring in the pistol grip when you remove it. Remove the pivot pin detent spring and set it aside.


The safety detent will most likely fall out when you remove the safety, and the takedown detent may also fall out. Just be careful not to lose them and make sure they go back in the correct holes when you are reassembling. Also note the correct positioning of the takedown pin.

With a small punch, drive out the hammer pin first then the trigger pin. It’s best if the hammer is decocked before doing this. Remove the hammer, trigger and disconnector.


With the allen wrench provided with the Elftmann trigger, screw the two screws down so they are about flush with the bottom of the trigger housing.

Insert the housing in the lower and put the hammer and trigger pins and the safety back in the lower.
Also note that there is a metal plate with the Elftmann trigger assembly you can put in as well. This is primarily used on carbon fiber AR15s to prevent cracking the lower. This is optional in an aluminum receiver. You can put it in if you don’t want the tensioning screws bearing directly on the lower or leave it out. It will operate the same either way.

Tighten both of the tensioning screws down into the lower evenly on both sides until they are snug and the hammer and trigger pins cannot be pushed out.

Insert the locking screws in on top of the tensioning screws to lock them in place. These screws are supposed to be Loctited in with Loctite that is provided with the trigger assembly. I don’t show it in this demonstration.

Reinstall the pistol grip, making sure the detents are in their proper locations as well as the springs. Compress the springs down straight and be careful not to bend either spring to the side.
Do a function and safety check on the trigger group to make sure everything is working properly and that the hammer will not drop when the gun is on safe.

Buy It Now:


If you ever have questions about your rifle, you are always welcome to call Windham Weaponry Customer Service (Toll Free: 1-855-808-1888). Shoot Safely!


Cheryl E

CUSTOMER SERVICE CORNER
Cheryl Eliason, Customer Service Manager


We receive a variety of customer service related questions from our customers, and in order to better serve all of you, highlight one question each month.


This month’s question is:
Where is the serial number located on my Windham Weaponry rifle?


Answer:
The serial number on your Windham Weaponry rifle is located on the left side of the Lower Receiver – on the Magazine Well just below the Windham Weaponry script logo. Exceptions to this are our Carbon Fiber and RMCS Multi-Caliber Rifle models where the serial number is located just below the Safety.

     Here’s the WW Aluminum Lower Receiver…

     Here’s the WW Carbon Fiber Lower Receiver…
     Here’s the WW RMCS Multi-Caliber Lower Receiver…


WINDHAM WEAPONRY FEATURED PRODUCTS


Matt Hasty, Retail Sales Manager


Windham Weaponry Free-Floating Railed Handguards for Carbon Fiber Rifle – 15″ / 13″ / 7″
 
Windham Weaponry now offers railed, M-LOK compatible forends specifically designed for our Carbon Fiber Rifles. These high quality forends are 100% CNC machined from American made 6063 aluminum extrusions to exacting tolerances, then hard coat black anodized to MIl SPEC 8625. They are machined for maximum weight reduction while retaining rigidity and strength, and the top Picatinny rail is manufactured to MIL STD 1913. The M-LOK system mounting points are manufactured to Magpul technical specifications to ensure perfect fit with all Magpul accessories. Built-in Q.D. Sling Swivel pockets at 3:00 & 9:00 forward positions on the hand guard offer convenient mounting for your sling of choice. The American made Barrel Nut is 100% CNC machined of 4140 pre heat-treated steel (28 to 32 Rockwell hardness), drilled for weight reduction, and black nitrite
finished (a QPQ corrosion resistant finish). These handguards also feature the Windham Weaponry logo engraved into the side panels.
Here’s the WW Carbon Fiber Rifle with a 13″ Railed Handguard installed
Because Barrel Nuts on Windham Weaponry Carbon Fiber Rifles are factory installed with Loctite,it is recommended that this handguard be installed by Windham factory technicians – a service we offer at no charge with purchase of the hand guard. Contact Customer Service for instructions about sending your Carbon Fiber rifle in for this upgrade.

Carbon Fiber Rifle Railed Handguard Weights:
15″ – 12.0 oz. / total weight with barrel nut – 14.4 oz.
13″ – 9.6 oz. / total weight with barrel nut – 12.0 oz.
7″ – 6.4 oz. / total weight with barrel nut – 8.8 oz.

15″ Part Number: HGD-WW-CF-15 / Price: $ 154.95
13″ Part Number: HGD-WW-CF-13 / Price: $ 144.95
  7″ Part Number: HGD-WW-CF-7 / Price: $ 134.95


Want to Order? or If You Have Questions? 
Call Customer Service / Sales  1-855-808-1888


Todd C

LAW ENFORCEMENT
Todd J. Coons, VP Law Enforcement & International Sales
WHAT’S NEW IN LAW ENFORCEMENT
 
It’s hard to believe that winter is just around the corner and that means SHOT Show. I will be attending SHOT Show again this year and if any of you are going to be doing the same, please come by the booth to say hello and check out our NEW products. We’ll be in Booth #10376
As I mentioned in last month’s newsletter I was going to be attending the Tennessee Law Enforcement Training Officers Association Conference. I would like to thank all of you that attended the conference and came by to say hello. Also a big shout out to those that attended the Windham Weaponry Armorers Course at the conference. We had 25 students in the class and once again it was a great class taught by Retired Metro Nashville Officer Greg Lee.
Here is Greg Lee (right) with the Winner of the Windham Weaponry Rifle – Michael Brock (left) at the the TLETOA Conference:


I also attended the Orlando SWAT Round Up for the first time this year and that too was a huge success. We had the opportunity to get some time on the range with two one hour live fire demos. We had over 60 officers and visitors attend the two live fire demos, and it was awesome!
Please keep in mind that if your department or agency is looking for rifles, and if you have firearms to trade, PLEASE reach out to my assistant Cindy Thompson:


 Cthompson@windhamweaponry.com  or me, Todd, at  Tcoons@windhamweaponry.com  as we would LOVE to work with you.

Thank you all for your support.


Stay safe out there,
Todd J. Coons
Vice President, Law Enforcement & International Sales 


CUSTOMER FEEDBACK  In this Section, we encourage our customers & friends to send us their comments, photos and experiences with Windham Weaponry products. What are you doing with your Windham?


***************
A Note from a Veteran…

RE: Windham Weaponry Gov’t. Model
I received the Government model last week and cannot be happier with it. It reminded me of the first M-16 issued to me in 1967 as to size and feel. A real rifle. The quality of workmanship is just amazing! The range results was better than I ever expected. The trigger crisp, action smooth and sub MOA groups out to 300 yards. It was like shooting a laser. Thanks so much for your generous offer to us NRA instructors. I know this is not my last Windham firearm.

Walter Lee
Major, US Air Force (Retired)


*******************
A Windham Fan…


I recently purchased one of your awesome SRC’s in .223/5.56 and I’ve done minor trigger polishing on other rifles I’ve owned… decided, after watching several YouTube videos, to polish your trigger group… DAMN!!! You guys beat me too it… ruined all my fun… LOL… you did a nice job… didn’t expect that… now I have to find something else to polish…
Tony A.


**********************
To send items, please email:  newsletter@windhamweaponry.com   We look forward to hearing from you!


On Nov. 19th, the Windham Indoor Shooting Range & Retail Store celebrated its One Year Anniversary 


We had lots of exciting events to mark the date….  


Our Raffle for a Windham Weaponry SRC 1st Anniversary Rifle
 was won by Rebecca Poole.


The Door Prize Raffle –  a Glock Pistol – was won by Eric Tarbox.


And, as all proceeds went to help support Local Food Pantries, 
we were able to donate $2,700 to these worthy causes. Thank You!  
 
We had a Chili Cook-Off! 


Thanks to all our “Chef Competitors” – voting on the favorite pot results were:


First Place – Allen Faraday
Second Place – Harvey Macomber
Third Place – Peter Joyce
Fourth Place – Dale Lauten
Fifth Place – Sam Chidester
 
And, we were happy to have some of our Veterans with us from the
Southern Maine Marine Corp League. Thank you for your service!


We had representatives from some of our local Fire; 

EMT & Law Enforcement Departments on hand.

Portland Maine Bomb Squad; Windham Fire Dept. & others – thank you all!
And, the Store & Range were very busy all day…

 
The Windham Indoor Shooting Range
…where “Training Begins at the Door.”
 
For complete information see:  www.windhamindoorshootingrange.com
Windham Weaponry on AR15.com
AR15.com Logo
We regularly respond to questions and topics on this informative website.


Contact Us:


Windham Weaponry, Inc.
999 Roosevelt Trail
P.O. Box 1900


Windham, ME  04062  
U.S.A. 
Tel: 207-893-2223
Fax: 207-893-1623


Phone Sales/Customer Service:
Toll Free: 1-855-808-1888


Your feedback is always welcome.
 
Feel free to send us photos of how you enjoy using your Windham Weaponry rifle. We would love to hear from you.
 
Please contact us through windhamweaponry.com/  or


SHOOT SAFELY,
Windham Weaponry Logo

Newsletter – Vol. 5 / Issue 10


Vol. 5 / Issue #10 / Oct. 2016


Mark at SFGC

MARKETING NEWS


Mark Eliason, VP Sales & Marketing
Somehow, the Summer has left us and we’re well into Fall. The foliage in Maine is at peak throughout much of the State, and many folks are thinking “hunting”!
If you’re looking for an AR platform rifle with big game knockdown power, the Windham Weaponry 7.62x39mm SRC is the answer. As our featured firearm for this month (just below), its ready for the hunt as soon as you add your favorite optic, scope, or accessory sights. With a highly accurate chrome lined 16″ barrel, it combines light weight (just over 6 lbs.) with “quick to target” carbine handling. Because its a familiar AR platform rifle, it’ll accept all the aftermarket AR accessories hunters demand – and we have the 5 round hunting mags you need. The adjustable length 6 position telestock and fairly soft recoil of the 7.62 round also make it a great gun for the youth hunters. Proof of that is in the Customer Feedback section below where a Maine boy – barely 8 years of age – shows the Black Bear he bagged!
The Windham Weaponry 7.62x39mm SRC – as well as all our rifles and accessories – can be seen at windhamweaponry.com/ or call us for a free catalog (1-855-808-1888).
As always, hunt and shoot safely, and feel free to contact us with any AR related questions.

This Month’s Feature Rifle:
Windham Weaponry 7.62x39mm SRC 


Model:

 R16M4FTT-762
MSRP: $1,056.00


Caliber: 7.62×39 mm
Weight/Length: 6.15 lbs without magazine. / 36.125″ overall (32.375″ with Telestock collapsed)


Type:  Rifle, Semi-Automatic, Gas Impingement System
Magazine: 30 Rounds (accepts all standard AR platform sizes)
Receiver: Forged 7075 T6 aluminum flat top upper receiver with Aluminum Trigger Guard
Receiver Finish: Hardcoat Black Anodize Finish
Bolt:  Carpenter 158 Steel
Barrel:  16″ M4 Profile, Chrome Lined with A2 Flash Suppressor
Barrel Material: 4150M Chrome Moly Vandium 11595E Steel
Rifling: 1 x 9.5″ Right Hand Twist
Stock/Forend: 6 Position Telestock with WW Logo / M4 Double Heat Shielded Handguards
Pistol Grip: A2 Black Plastic Pistol Grip
Rear Sight: None – Ready for Optics or other type accessory sights
Front Sight: None – Picatinny Rail Gas Block – Ready for accessory sight
Includes: Lockable hard plastic case, black web sling, full color Operation & Safety Manual, Transferable Lifetime Warranty
See your local FFL Dealer to purchase.

Erik at his bench
FROM THE GUNSMITH’S BENCH
Erik Winter, Windham Weaponry Gunsmith
 
TOPIC: Gas Key Removal & Replacement


Sometimes it is necessary to replace the gas key on an AR15 if it becomes damaged or plugged or if a gas key screw is broken.  I’ve seen blown primers get wedged down inside which turns the rifle into a single shot. Most times it is impossible to remove it so replacement of the key and screws is necessary. Also damage to the key can happen if the carrier is dropped on the key.

Since the keys are usually pretty heavily staked on, removing the screws isn’t always as simple as just using an Allen wrench and taking them out. Here’s what I do to remove and replace a gas key.

Always wear safety glasses when doing this!

First disassemble the Bolt Carrier. Then put a small grinding stone in a Dremel tool.


Right on top of the stake carefully grind through the staking and slightly into the screw. You need to relieve the area where the steel is pushed into the screw

Do this to all four stakes.


Remove the screws. In this case the front screw came right out with no problems.

The rear screw however still did not want to budge. If it doesn’t want to come, out apply torch heat to the screw and surrounding area. Usually a little heat will help you loosen the screw. It’s important not to damage the screw head. If this happens and the Allen wrench can no longer get a bite on the screw, then you will need to drill the entire screw out. It can be done but you will need a very hard drill bit, so try to avoid that.

Remove the key and screws and discard.


Clean the mating surfaces of the carrier and the new replacement gas key. If there is any carbon build up use a solvent and a brush to get all of it off. Also if there is carbon build up in the gas hole (the hole ahead of the screw holes), clean all of that out as well.


Screw the new gas key into place and snug the screws down. You can do this by hand if you just snug them up good and tight, but if you have access to an inch pounds torque wrench, that is best.
The mil-spec torque is supposed to be between 50-58 inch pounds.


To re-stake the key, I have the luxury of using the gas key press we use on the Production Floor. You most likely will not have access to one of those, so you can stake the key by using a cold chisel to push the edges of the gas key into the screws, or you can use a center punch on top of the gas key next to the screws.
 

If you ever have questions about your rifle, you are always welcome to call Windham Weaponry Customer Service (Toll Free: 1-855-808-1888). Shoot Safely!


Cheryl E

CUSTOMER SERVICE CORNER
Cheryl Eliason, Customer Service Manager


We receive a variety of customer service related questions from our customers, and in order to better serve all of you, highlight one question each month.


This month’s question is:
I purchased a Windham Weaponry Model WW-15, I don’t see that Model Number in your list of rifles on the website?


Answer:
MOD. WW-15 is stamped on all of our aluminum AR-15  CAL .223/5.56 lower receivers.  It is Windham Weaponry’s designation for the AR-15 style rifle.

Your rifle part number is not stamped on the rifle. If you do not see your rifle listed on our website or in the catalog it may be a variation we build based on one of our standard models.
With your Serial Number, we’ll be happy to look that Model Number up for you to determine the exact build of your rifle. Just contact Customer Service by Email:  information@windhamweaponry.com  or call us toll free at 855-808-1888 with your serial number (it’s the number stamped into the magazine well after two letters on the lower receiver).


WINDHAM WEAPONRY FEATURED PRODUCTS


Matt Hasty, Retail Sales Manager


Elftmann Drop-In Single Stage Match Trigger for .308/AR10 Rifles
Part Number: 8448592-308-ELF
Price: $ 249.95
The ELF Drop-In AR-10 Trigger has been built to withstand the punishment of high powered calibers. Its the only AR trigger using aircraft needle bearings for an incredibly smooth and fast trigger pull. The heavy hammer combined with .043 double double wound polished piano wire hammer spring ensures full ignition of any ammo including .308 and 7.62×39. Pull weight from 2 3/4 lbs. to 4 lbs. is easy to adjust – can be done in seconds without removing the trigger from your lower receiver. This strong, light trigger system is made of wire EDM machined, hardened A2 tool steel and lightweight aircraft-grade aluminum. Installation can be done in minutes using your AR’s original hammer and trigger pins. The amazingly short takeup, glass-rod crisp break and next to zero over-travel can be compared to the finest custom 1911 triggers. 100% made in America with a Lifetime Guarantee by Elftmann.
* Fits any mil-spec AR-15 (Large pin Colt available)
* Absolutely Drop-Safe regardless of pull-weight
* Exclusive double double wound hammer spring and heavy hammer ensure proper ignition of any ammunition
* Very short pull and reset allows for rapid follow up shots and greater accuracy
* Sturdy trigger assembly designed for rugged, trouble-free use – made of lightweight aircraft-grade aluminum and hardened steel
* Unique design of disconnect allows full 1/4″ width eliminating possibility of wear and double-firing
* High performance trigger and hammer needle bearings for smoother and faster firing 
Want to Order? or If You Have Questions? 
Call Customer Service / Sales  1-855-808-1888


Todd C

LAW ENFORCEMENT
Todd J. Coons, VP Law Enforcement & International Sales
WHAT’S NEW IN LAW ENFORCEMENT
I would like to thank all of you out there that have taken advantage of the Fall Sale I’ve been having on our 30 caliber rifles. Please know this special will stop at the end of October. I would also like to thank all of you that have sent in your hunting success photos! As you can see in this newsletter we have a few that we thought we would share with everyone. 


As many of you know, we are now coming into show season. I’m going to be attending the following shows over the next few months. I’ll be at the Tennessee Training Officers Association Show from November 13th to the 15th. Then, I’ll be flying to Orlando SWAT on November 15th and will be there for the week. I’ll be with GT Distributors at Orlando SWAT so please come by the show and look us up. I’ll be heading to Vegas for the NFR Rodeo finals the first week of December and off to SHOT Show the week of January 16th.
Please keep in mind that if your department or agency is looking to custom build rifles and if you have firearms to trade, PLEASE reach out to my assistant Cindy Thompson:
 Cthompson@windhamweaponry.com  or me, Todd, at  Tcoons@windhamweaponry.com  as we would LOVE to work with you.
Thank you all for your support.


Stay safe out there,
Todd J. Coons
Vice President, Law Enforcement & International Sales 


Rifle Raffle WINNERS!
Your may remember items in previous newsletters where we set up a 
Support Raffle for our employee & friend, Karen Fogarty…


Karen Fogarty was struck from behind by an uninsured motorist while riding her Harley on May 21st. 
A Fundraiser was established to help her through her difficult and expensive recuperation time. I’m pleased to report that Karen has come back to work at Windham Weaponry and we’re delighted to have her back.
THE WINNERS OF THE 3 DIFFERENT RIFLES ARE:
1st Prize Winner:  Steve A. from Spokane, WA
 Donated from the private collection of John DeSantis, former CEO of Bushmaster Firearms…
A 20″ DPMS .308 with Leupold Scope; Magpul Adjustable Stock; 
Carbon Fiber Handguard; Ambi Safety and Mag Release
2nd Prize Winner:  Susan W. from Standish, ME
Donated from the private collection of Mark Eliason, V.P. of Sales & Marketing at Windham Weaponry… 
A 24″ Windham Weaponry .223 VEX Wood Stock Series Varminter 

3rd Prize Winner:  Byron S. from Fort Collins, CO


Donated by Shannon & Mike Beton of Civil Arms…
A 16″ Daniel Defense 5.56mm DD Custom Rifle with Railed Handguard


I know I speak for Karen, and everyone at Windham Weaponry, 
when I say THANKS to all who showed their support! 


CUSTOMER FEEDBACK  In this Section, we encourage our customers & friends to send us their comments, photos and experiences with Windham Weaponry products. What are you doing with your Windham?


***************
A great Maine bear hunting story…
Hi there,
This is Sarah & Jeremy from Bethel Bait Tackle & More. Our son Oliver shot this 181 lb. Black Bear – guided by Bear River Guide Service with hounds in Bethel Maine on October 10th, 2016 with a Windham Weaponry SRC in 7.62×39 – with a butt pad, open sights, and 5 round magazine. Oliver was just about to turn 8 years old. This rifle was the most accurate, with the least recoil for his size. He delivered a kill shot to the left front shoulder. They changed the hunting age limit this year so we believe him to be the youngest hunter to bag a black bear with this rifle!
Thanks so much for sharing,
Sarah, Jeremy, & Oliver
Bethel Bait Tackle & More


Two days later, Sarah emailed again…
Hi – I got my Bear this morning! – with the same Windham 7.62×39 SRC!
The crew put the bear on the Rock for me. The bear was in deep woods on the side of a mountain it would have been an uphill drag. We cut it and quartered it in the woods, and hiked it out in backpacks. We estimate 200 lbs. Oliver’s was closer to the road so it was drag-able. I’ll be processing the meat tonight!
– Sarah
********************
By the way…. 


If you check out  http://www.bethelbait.com  you’ll see that Sarah is an accomplished wildlife artist. Her works appear on a variety of interesting mediums: wood slabs; antique saw blades; moose antlers; Adirondack chairs; axe handles; etc. Nice work Sarah!


*******************
Another fan of the SRC…


I own the SRC. Think its the best, most versatile rifle I have ever owned. Only thought I might have, would be a take-down in same type i.e. compact & portable. I thank you for being such a fine family.
Carl E. Morrow

**********************


To send items, please email:  newsletter@windhamweaponry.com   We look forward to hearing from you!


The Windham Indoor Shooting Range & Retail Store is coming up on its One Year Anniversary on Nov. 19th! 
We’re planning some exciting events to mark the date, so look for further information in coming newsletters and email blasts.  
Here is the link where you can buy tickets to the 

Windham Weaponry SRC 1st Anniversary Rifle Raffle:

Buy Raffle Tickets Now!

 
Remember, all proceeds go to help support Local Food 
Pantries – THANKS, & Good Luck…


The Windham Indoor Shooting Range
…where “Training Begins at the Door.”


For complete information see:  www.windhamindoorshootingrange.com
Windham Weaponry on AR15.com
AR15.com Logo
We regularly respond to questions and topics on this informative website.


Contact Us:


Windham Weaponry, Inc.
999 Roosevelt Trail
P.O. Box 1900


Windham, ME  04062  
U.S.A. 
Tel: 207-893-2223
Fax: 207-893-1623


Phone Sales/Customer Service:
Toll Free: 1-855-808-1888


Your feedback is always welcome.
 
Feel free to send us photos of how you enjoy using your Windham Weaponry rifle. We would love to hear from you.
 
Please contact us through windhamweaponry.com/  or


SHOOT SAFELY,
Windham Weaponry Logo
0
YOUR CART
0
Your cart is emptyRETURN TO SHOP